Author: em

  • C++ Compile Time Visitor (EGM pt.2)

    Recently I noticed a post on a social media site, the author was complaining about C++. Their main complaint was how feature rich and confusing the language was. He was obviously not a C++ programmer and overlooked one of C++’s most powerful and best features, compile time logic.

    Compile time logic in C++

    C++ is able to do certain logic faster than any other language due to processing it at compile time instead of during runtime. This effectively makes the time complexity of your algorithm at run time a constant O(1) (instant) instead of based off of the logic you wrote.

    The mechanism behind this is C++’s templating ability. A template is just a pattern for the compiler, when you define the template, you are creating an additional rule for the compiler, not your program. When your program is compiled into machine code there is no reference to templates. This is why you cannot do template operations in a debugger because, it has already been calculated before running.

    Now as you saw in part one, we implemented a lot of our logic and structure of our manager through templates, the pros of this is that we get to implement a lot of generic behavior for our manager using compile time strategies.

    Implementing Compile Time Logic

    Our Manager was designed around our TypeList object as you saw. Everything you know about a TypeList is available at compile time, because it is a templated type. Based on how the source code defines our TypeList we get our templated List of Types and operations on our list of Type during compile time (O(1)). A refresher on the definiton of our TypeList

    template <template <class> ... Types>
    struct TemplateTypeList {};

    As always you can find full examples of the code you’re seeing in the egm repository.

    C++ has a lot of tools that they have introduced over the years that aide a lot in doing compile time logic. Here if you haven’t seen it before we use the fold expression (...) introduced in C++11 to represent multiple types for the programmer to use. Before the fold expression all template logic had to be bound to a max number for the compiler to go to, but with the fold expression, the compiler can determine, just how many types it needs with no need for bounds.

    So now the main way to speed up our program, is to take our graph of types defined in the relations of these TypeLists to make some of our logic compile time. The graph I am talking about is that each type has a TypeList of other types representing the bases of the type itself (remember the GenBaseHierarchy in part 1). So our visitor we want to create will visit this graph in the order we define. Just to further explain the graph I am talking about let me define a quick example below:

    template <class ManagerPolicy>
    struct Base : public ManagerPolicy {
      using Info = TypeInfo<Base>; // no parents
      ...                          // root of tree
    };
    
    template <class ManagerPolicy>
    struct Left : public ManagerPolicy {
      using Info = TypeInfo<Left, TemplateTypeList<Base>>;
      // this has one parent "Base"
    }; 
    
    template <class ManagerPolicy>
    struct Right : public ManagerPolicy {
      using Info = TypeInfo<Right, TemplateTypeList<Base>>;
      // this has one parent "Base"
    };
    
    template <class ManagerPolicy>
    struct Derived : public ManagerPolicy {
      using Info = TypeInfo<Derived, TemplateTypeList<Right, Left>>;
      // this has two parents, right and left
    };

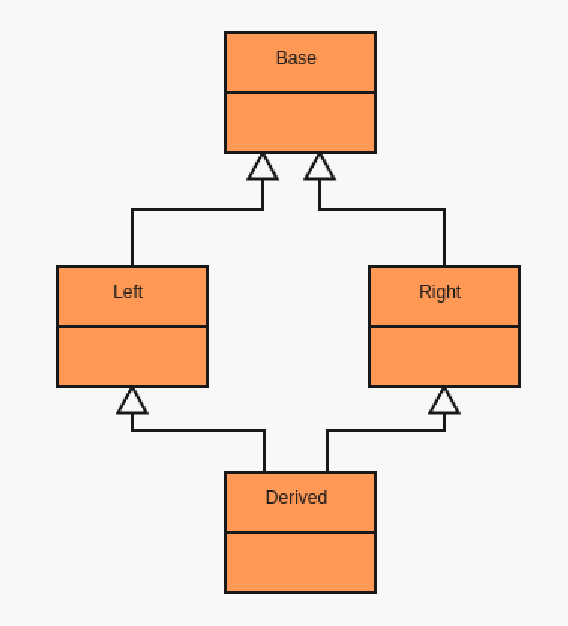
    So these are EGM compatible types, so the syntax is a little special, but our general graph structure looks like that modeled in the image below on uml.cafe

    Here you can see the classic “dangerous” diamond inheritance pattern that we have defined. The goal now is to write a general routine that uses template definitions in our C++ code to produce compile time logic to traverse this graph. That is generally what I mean by a visitor. A visitor generally means some sort of function or procedure in a language to “visit” all parts of a data structure. A common visitor that people like to use is the classic foreach function. That function usually takes a data structure and another function to execute on each item in that data structure. Now for this article we will be implementing a visitBasesBFS visitor to show different techniques of visiting and compile time logic.

    Visit Bases BFS

    So we have all probably learned about BFS and DFS or “breadth first search” and “depth first search” in our algorithms class, or online tutorial. The easiest for us to implement with the design we have used is BFS.

    A good way to think about traversing breadth first is to put the children of each node into a queue (last in last out) data structure. So our approach will be to store the types we need to still visit into a typelist that we will modify as a queue.

    Okay, so first we want to set up the struct and function for traversal, we define a template class with at first two template parameters, the Visitor type provided by the user using our Visitor, and the Queue which will be our TypeList.

    template <class Visitor, class Queue>
    struct VisitBasesBFS;

    We will now define specializations of this template to expand the TypeList to allow for our subsequent calls to visit the next node in the graph. This is where we implement the queue visiting order. We use a lot of utilities here from egm which I had described in the last article make sure to check that out. Something new here is what I call a DummyManager type. Now this is mostly a utility type to access type compile time meta info without putting your type into a Manager implementation. We need it specifically to access the type’s BaseList that we had defined above.

    // defining aliases for more succinct example :P
    template <template <class> class ... Types>
    using TT = TemplateTypeList<Types...>;
    template <class R, class L>
    using Cat = typename TemplateTypeListCat<R,L>::result;
    using DB = DummyManager::BaseElement;
    
    // Expand the Queue
    template <class Visitor, template <class> class Front, template <class> class ... Rest>
    struct VisitBasesBFS<Visitor, TT<Front, Rest...>> {
      // define next struct to execute visit in queue order
      using Bases = typename Front<DB>::Info::BaseList;
      using Next = VisitBasesBFS<Visitor, Cat<TT<Rest...>, Bases>>;
      static void visit(Visitor& visitor) {
        visitor.template visit<Front>();
        Next::visit(visitor);
      }
    };
    
    // terminating specialization
    template <class Visitor>
    struct VisitBasesBFS<Visitor, TT<>> {
      static void visit(Visitor& visitor) {} // do nothing
    };
    
    // wrap it into a template function
    template <template <class> class Start, class Visitor>
    void visit_BFS(Visitor& visitor) {
      VisitBasesBFS<Visitor, TT<Start>>::visit(visitor);
    }

    Okay so I’m sad to say that after defining all of these aliases and specializations, the above still will not visit our graph properly at compile time. This would work fine if it was only applied to trees but our hierarchy can create that dangerous diamond as shown, which will cause errors in the recursion logic we have defined. A call to our current visit_BFS<Derived> will visit our Base type twice. In order to fix that we need to keep track of the nodes that we have already visited so that we don’t call visit<Base> twice.

    To solve our little conundrum we need to alter our template definition of our VisitBasesBFS. We are going to add another TypeList to keep track of what types we have already visited. Here I use constexpr which was made available in c++17. This is another feature to use with templates to easily express compile time functionality. Any logic preceded by a constexpr will be calculated by the compiler. You just need to make sure that all the variables have been made available at compile time. I also use std::conditional which chooses a type based on the boolean provided.

    // some more aliases
    template <template <class> class T, class List>
    using Index = constexpr TemplateTypeListIndex<T, List>::result;
    
    template <class Visitor, class Queue, class Visited = TT<>>
    struct VisitBasesBFS;
    
    template <class Visitor, template <class> class Front, template <class> class ... Rest, class Visited>
    struct VisitBasesBFS<Visitor, TT<Front, Rest...>, Visited> {
      constexpr bool front_visited = Index<Front,Visited> != -1;
      using Bases = typename Front<DB>::Info::BaseList;
      using Next = std::conditional<
        front_visited, // bool
        // front_visited == true
        VisitBasesBFS<Visitor, TT<Rest...>, Visited>, 
        // front_visited == false
        VisitBases<Visitor, Cat<TT<Rest...>, Bases>, Cat<TT<Front>,Visited>>
      >; // end of Next
    
      static void visit(Visitor& visitor) {
        // check compile time if we have visited
        if constexpr (!front_visited) {
          visitor.template visit<Front>();
        }
        Next::visit(visitor);
      }
    };
    
    // terminal type
    template <class Visitor, class Visited>
    struct VisitBasesBFS<Visitor, TT<>, Visited> {
      static void visit(Visitor& visitor) {}
    };

    That’s all you need! Now we can define a visitor, and we have no overhead from doing our graph traversal logic because it has been dealt with by the compiler so it knows where to go instantly. This is thanks to our conditional type of Next, where if we haven’t visited the type we add it to the visited list, and if we have visited it we just pop the front from the queue.

    An implementation of a visitor here would look like so:

    struct ExampleVisitor {
      template <template <class> class T>
      void visit() {
        std::cout << 
        "the current type is " << 
        T<DB>::Info::name() << std::endl;
      }
    };
    
    // run our visitor
    ExampleVisitor visitor
    visit_BFS<Derived>(visitor);

    The following code if run should print out:

    the current type is Derived
    the current type is Right
    the current type is Left
    the current type is Base

    Conclusion

    Something fun / eventually it can get annoying is that if you have a lot of types, the compiler can take a LONG time to do it’s logic and translate it into machine code so many times. For some computers the c++ compiler will crash because there is not enough memory available to hold all of that complexity. This is the main drawback of compile time logic but with a smart or segmented implementation this can be avoided.

    With c++11 and c++17, as well as more recent features (and future features) implementing this compile time logic in more succinct and straightforward ways is becoming increasingly easy. As far as I know there is no other language that can translate so much logic into pre-compiled machine code as C++, and that is what makes C++ one of the fastest and most powerful languages still to this day.

    I thought I could get to our smart pointer implementation in egm which binds the pointer logic to object pool semantics but I thought it would be better to just focus on the visitor for now. I am also glad to say that all of my work (all though now part time because of my new job!) is culminating into a new abstraction update to the uml.cafe api that I am going to for sure be writing about and building onto my first Tutorial.

    As always if you have any questions, email me at [email protected] or just leave a comment below! Thanks for reading and see you next time!

  • Generic Manager Design Pattern for C++(EGM)

    Recently while working on uml-cpp, which is an object pool of UML types used for the uml.cafe backend, I realized that there could be serious use in making the strategies I used available in a generic sense. So the last couple weeks in my free time I have taken the core functionalities of uml-cpp and packaged them into a header only library for easy reuse and object pool implementations. Hence egm was born, I want to walk through the library and some of the fun C++ strategies I used to make it easier and faster to run the library for users.

    The Manager

    So EGM stands for EGM Generic Manager, inspired by other recursive software acronyms like GNU and YAML. A manager in this sense just means a C++ object to control the memory of other objects. The manager is generic because it can be used for multiple types through its template parameters. The signature for the manager object in EGM, EGM::Manager looks like the following:

    template <class TypeList, class StoragePolicy>
    class Manager;

    We can ignore the StoragePolicy template parameter for now, but the TypeList template parameter is fundamental to the implementation of other Managers using EGM::Manager. A C++ TypeList is a type that serves as a list of other Types. On a quick side note I do highly recommend reading Alex Andrescu’s “C++ Generic Programming and Design Patterns Applied”, because a lot of the concepts I use are contained within that book. The TypeList provided to the manager is just the list of Types that we want to manage objects of. So if we had two types Foo and Bar, we would provide a TypeList holding both of them to a manager to manage their types, which would look something like this pseudo code:

    using FooBarManager = Manager<TypeList<Foo, Bar>>;

    Now that is pseudo code because the types provided to the manager need to be constructed in a certain patterns themselves. All types to the manager need to be first, a policy class. A policy class is simple a class that inherits template parameter:

    template <class Policy>
    class PolicyClass : public Policy { };

    The reason it needs to be a policy class is because the Manager injects generated functionality into your types through that policy class relationship, we will dive into that when we go into GenBaseHierarchy later. Now EGM provides a special TypeList to allow the manager to handle these types, this TypeList is called EGM::TemplateTypeList in the code, you can see its definition here. It provides helper types like TemplateTypeListSize, TemplateTypeListIndex,TemplateTypeListCat, TemplateTypeListAppend etc. to mutate and get info from the type list. So a valid but incomplete definition of a Manager would be something like this:

    using FooBarManager = Manager<TemplateTypeList<Foo, Bar>>;

    Now before diving fully into the types lets look at what the manager can do, what would an Object Pool Manager do? Well the main functions of the Manager are listed briefly below:

    // Instantiating a Manager
    FooBarManager m;
    
    // Creating an object
    auto foo = m.create<Foo>();
    
    // manager provides ids to track objects
    EGM::ID foo_id = foo.id();
    
    // release object from memory
    m.release(foo);
    
    // acquire object into memory
    foo = m.acquire(foo_id);
    // or
    foo = m.get(foo_id);
    
    // erase object completely
    m.erase(foo);

    So as you can see the general functionality entails, creating objects, keeping track of objects, controlling the memory of those objects, and deleting those objects. No lets see how to create proper types to be used by the manager!

    The Types

    Now as I was stating before our special types have to be defined in a special manner. Beside’s being a template class there are some key concepts that need to be applied to the type. First of all, all references to other Types controlled by the manager, they need to be stored in some version of an EGM::AbstractSet. EGM functions by using basic set theory to minimize size and also put associations with other types to reduce duplicate code. The Manager handles references internally through these set objects. I won’t dive into the implementation of the Set or the Reference mechanics of the Manager because they are a little too complicated to discuss with everything else in this article, but I will discuss how to use these sets. A basic Set to just hold references of other types would be defined similar to so:

    template <class> class Bar; // forward decaration
    
    template <class ManagerPolicy>
    class Foo : public ManagerPolicy {
      EGM::Set<Bar, Foo> bars = EGM::Set<Bar, Foo>(this);
    };
    
    template <class ManagerPolicy>
    class Bar : public ManagerPolicy {};
    
    // usage
    
    FooBarManager m;
    auto foo = m.create<Foo>();
    auto bar = m.create<Bar>();
    foo->bars.add(bar);
    cout << "foobars front: " << foo->bars.front().id()

    Now there are plenty of different Set Types, here is a list of all of them:

    • ReadOnlySet – a set that can only be read from
    • Set – a set that is mutable
    • Singleton – a set that can only hold one element
    • ReadOnlySingleton – an immuatable Singleton
    • OrderedSet – a set that preserves order
    • ReadOnlyOrderedSet – an immuatable ordered set

    Now sets can subset and redefine other sets (this is all very familiar to UML properties) through their subsets and redefines functions. They can also be marked as opposites to other sets in other types. All of this functionality should be put in a private function called init, these are called when you put the EGM MANAGED_ELEMENT_CONSTRUCTOR macro in your type. Here is definition of Foo and Bar that provides a relationship between foo.bars and a new set bar.foos as opposite to eachother:

    template <class ManagerPolicy>
    class Foo : public ManagerPolicy {
      using BarsSet = EGM::Set<Bar, Foo>;
      BarsSet bars = BarsSet(this);
      private:
      void init() {
      bars.opposite(&BarsSet::ManagedType::getFoos);
      }
      public:
      MANAGED_ELEMENT_CONSTRUCTOR(Foo);
      BarsSet& getBars() { return bars; }
    };
    
    template <class ManagerPolicy>
    class Bar : public ManagerPolicy {
      using FoosSet = EGM::Set<Foo, Bar>;
      FoosSet foos = FoosSet(this);
      private:
      void init() {
      foos.opposite(&FoosSet::ManagedType::getBars);
      }
      public:
      MANAGED_ELEMENT_CONSTRUCTOR(Bar);
      FooSet& getFoos() { return foos; }
    };
    
    FooBarManager m;
    auto foo = m.create<Foo>();
    auto bar = m.create<Bar>();
    foo->bars.add(bar);
    
    // following will print out barfoos size: 1
    cout << "barfoos size: " bar->foos.size();

    Now these types can have more than just relations to each other they can hold data as well. But before we go into customizing our types more, we need to provide some more information about our types to the manager. All types that are provided to a manager need to have a specialization for EGM::ElementInfo. This structure just provides compile time information to the Manager about our type that the Manager needs, if the Manager is set up to Serialize data which it is by default, then we need to atleast provide a method in ElementInfo called name that returns a string. If our type has any sets or data we need to provide sets and data functions that returns mappings to string data to identify the sets and data. If you want your type to be abstract, there needs to a static bool value named abstract set to true.

    Besides just the template specialization, each type needs to have an alias called Info referencing it’s inheritance pattern and binding it to the ElementInfo specialization. Building on our Foo Bar example lets create a new type named FooDerived that inherits from Foo and has a data field called field:

    template <class ManagerPolicy>
    class FooDerived : public ManagerPolicy {
      public:
      // provide TypeInfo binding to identify that 
      // FooDerived inherits from Foo
      using Info = TypeInfo<FooDerived, TemplateTypeList<Foo>>;
    
      // define a data field
      string field = "";
      private:
      void init() {} // nothing to do
      public:
      MANAGED_ELEMENT_CONSTRUCTOR(FooDerived);
    };
    
    namespace EGM {
    template <>
    struct ElementInfo {
      static string name() { return "FooDerived"; }
      template <class Policy>
      class FieldPolicy {
        ManagedPtr<FooDerived<Policy>> el;
        FieldPolicy(FooDerived<Policy>>& el) : el(el) {}
        std::string getData() {
          return el->field;
        }
        void setData(std::string data) {
          el->field = data;
        }
      };
      template <class Policy>
      static DataList data(FooDerived<Policy>& el) {
        return DataList {
          createDataPair<FieldPolicy<Policy>>("field", el)
        };
      }
    };
    }
    
    using DerivedFooManager = EGM::Manager<
      TemplateTypeList<Foo, Bar, FooDerived>
    >;
    
    DerivedFooManager m;
    auto foo = m.create<FooDerived>();
    auto bar = m.create<Bar>();
    
    foo->bars.add(bar);
    foo->field = "hello world";
    // etc...

    Now this is most of the configuration involved in creating EGM compatible data types. Feel free to look at more complex examples in the tests defined for egm. But I am going to stop here for configuring the Types, now that we can see the necessary definitions involved.

    The Implementation

    Now after configuring your Manager it seems almost like magic that it can create all of these types you have defined, and construct them and manage them. First thing after going through all of that, is how does the manager construct and create the objects it does through the types we provide. I was using auto for all of the returns from create so you don’t really understand the types that the manager is generating. Well to uncover the curtain, create<>() which is defined here, looks like this:

    template <template <class> class Type>
    ManagedPtr<Type<GenBaseHierarchy<Type>>> create() {...

    Now this create takes a template template parameter, which makes sense with how we define our types and pass them to create. Now the Type returned is a bunch of template classes, let’s go through them one by one:

    ManagedPtr

    So ManagedPtr is a special implementation of a smart pointer. It functions similar to std::shared_ptr, in fact it is just a wrapper around it. The additional functionality is that ManagedPtr can be used to count how many references are currently using it to automatically free memory. ManagedPtr ties into the object pool mechanics of the manager by allowing you to acquire, release and get the id of the ptr through it’s acquire, release and id methods.

    GenBaseHierarchy

    Now this type is a little bit more complex. This type takes the information you provided in your types and constructs a valid inheritance pattern to be used within the manager. So you see that the ManagedPtr returned by create holds a Type<GenBaseHierarchy<Type>>, so you can see that GenBaseHierarchy<Type> is the policy that the manager fills out our policy class with. GenBaseHierarchy's signature is defined below:

    template <
      template <class> class T, // our policy class
      class Bases = typename T<BaseElement>::Info::BaseList
    >
    struct GenBaseHierarchy;

    Now before looking at the implementation, we can see that there is a second Template Parameter with a default to the base list we defined in TypeInfo. So to build on this, the general purpose of GenBaseHierarchy is to manage inheritance. Now to implement this inheritance pattern, we virtually inherit every type from that base list, and then when there is no more base types to inherit, we inherit from the Manager’s BaseElement which holds ID and reference tracking. Here is the full Implementation of GenBaseHierarchy:

    // No bases just inherit from BaseElement
    template <template <class> class T>
    struct GenBaseHierarchy<T, TemplateTypeList<>> : virtual public BaseElement 
    {
      // Constructor implementation ...
    };
    
    template <
      template <class> class T, 
      // spread out the typelist
      template <class> class First,
      template <class> class ... Types
    >
    struct GenBaseHierarchy<
      T, 
      TemplateTypeList<First, Types...>
    > :
      // inherit first element GenBaseHierarchy virtually
      virtual public First<GenBaseHierarchy<First>>,
      // inherit rest of typelist recursively
      public GenBaseHierarchy<T, TemplateTypeList<Types...>> 
    {
      // Constructor implementation ...
    };

    Now it’s a little packed, but the idea is that the template specializations break out GenBaseHierarchy into different parts to inherit from all bases. So when the Manager is creating your objects of your type, it makes sure that all bases are in the proper place, and other managers can configure them differently. In the end this allows you to reuse your types with different managers to achieve different effects, simplifying implementations and allowing more reproducability.

    To be continued…

    So this article is getting a little long, I think I am going to split the second part, which is the Storage and Serialization policies that can be provided to the manager. With that we can take a look into more C++ design patterns used, including the Visitor pattern to compile time search hierarchies BFS or DFS, as well as possibly more! See you soon, and as always if you have any questions I check my email [email protected] so feel free to reach out to me there.
  • Generating an API from your UML Model

    One of the most powerful things that can be done with uml.cafe is it’s ability to generate JavaScript objects and functions that can be used in a RESTful API provided by the uml-client library. In this article I will show how to model out the types necessary for a graph network in uml.cafe, and then how to generate that model into an API for use in JavaScript applications.

    Creating the Model

    To start I’m going to create a project on uml-cafe. To do this you need an account so if you’re following along make sure to sign up for a free account. From there click the hamburger icon in the top right of the page, and click “Create Project”. This will bring up the project creation page. Choose an appropriate name and settings and click “Create” at the bottom of the page.

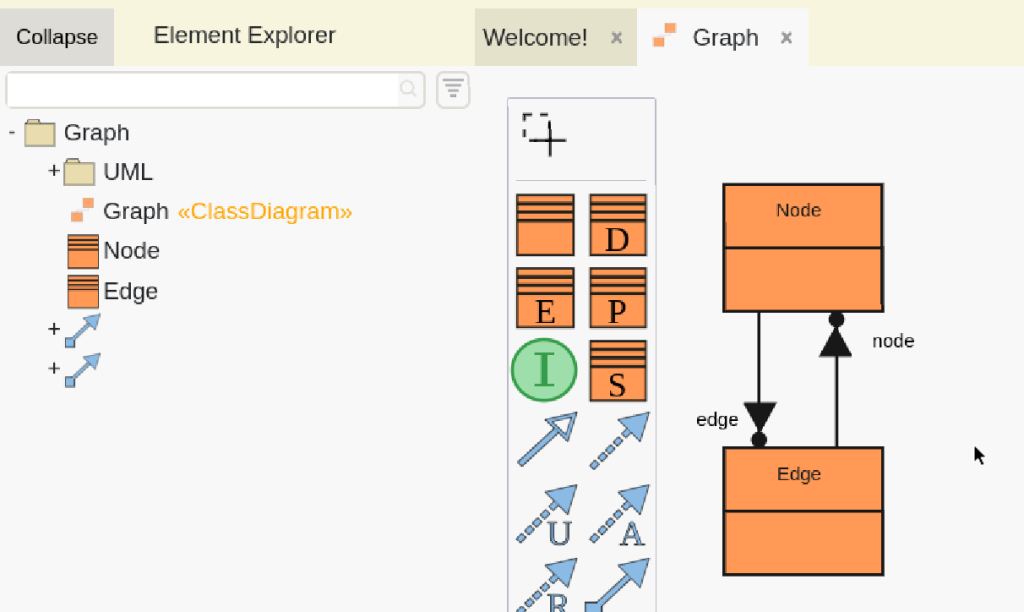
    We are now looking at a blank model, let us quickly model out the data needed for our graph network API. Let’s rename our base package from Model to Graph, then click “Create Diagram” in the upper right of the page. Let’s click the first icon in the diagram palette, “Create Class”, then place the empty class on our diagram. I’m going to right click it and rename it to Node. This will be the type in our API to represent a node in a graph network.

    I’m going to do the same thing and create another class named Edge this time. This will represent the connections aka: Edges, between nodes in our graph API. Now to define the relations between these two types, we will create two associations for them. We’re going to click the second to last icon in the diagram palette, If you hover the icon, it should show “Create Directed Association”. Make an association going from Node to Edge. Do it again and make an association between Edge and Node. Your diagram should look like the diagram in the image.

    This is a very simple model done in one of many ways, but it will sufficient enough for creating a simple set of datatypes to use with the RESTful API provided through the library uml-client.

    Generating and Using the API

    To use the data types in the model we made, we can create a new project, or add to an existing project using nodejs. I just created a new nodejs application the following way:

    $mkdir graph-example
    $cd graph-example
    $npm init -y
    $npm i uml-client@latest

    Now we have a new blank nodejs project with the latest version of uml-client installed. For this example we are going to just do everything in a single index.js file. Add the following to your package.json if you are following along:

    "bin": {
      "main": "./index.js"
    }

    Now let’s begin writing our index.js code, first we need to import the necessary objects and functions from uml-client, this would be UmlNodeClient and generate()UmlNodeClient is an object that holds our connection with the model’s server, and allows us to interact with it, generate() is a function that will allow us to generate a javascript object containing types we can construct and use to track data, we will use that slightly later. After importing we will instantiate a client like so.

    #!/usr/bin/env
    // index.js
    import UmlNodeClient from 'uml-client/lib/nodeUmlClient.js';
    import { generate } from 'uml-client/lib/generate.js';
    
    const modelClient = new UmlNodeClient({
      address: "wss://uml.cafe/api/",
      group: "moe",
      project: "Graph",
      user: "moe",
      password: "XXXXXXXXXXXXXX"
    });

    Now to instantiate a UmlNodeClient object we need to supply an object with certain options specified, let us go one by one through them.

    address : This is the address of the uml-cafe instance. If your project is hosted on uml.cafe the proper address is “wss://uml.cafe/api/”

    group: This is the name of the user who created and owns the project. If you made the project, it will be your username.

    project: This is the name of the project that we are connecting to.

    user: The user whose role we will be using to access the server.

    password: the plain text password to be used when connecting to the server.

    You can easily get the information needed by quickly looking at the URL of your project in your internet browser. For example https://uml.cafe/moe/Graph, you can see that the group is moe and the project is Graph, as well as the address would translate to wss://uml.cafe/api/ by replacing http with ws and adding /api/ after the domain.

    Note: There is also an object UmlWebClient, that behaves the exact same as UmlNodeClient, but it is made for the browser.

    Continuing on we need to generate our API from our model with the function we imported. The function does a lot of communication with the server so it needs to be called and awaited to get the Package information from our model, this requires an async scope.

    const generateAPI = async () => {
      await modelClient.initialization;
      const head = await modelClient.head();
      const graphModule = await generate(head, modelClient);
    }
    generateAPI();

    generate() takes two parameters. The first is the location of the types for the API, right now we are just using the head / root of the model to generate our type information on everything in the model. The second location is our client, the API is based within our model so the generated API will share the connection with it. Now let’s use the module we generated, this is the cool part.

    First we are going to get our special manager from the module created, graphModule.GraphManager. To instantiate a manager we need to tell it where in the model we want our data to be stored. We will quickly create a package and throw the data in there for now. The below code snippet shows how to do that with the existing modelClient.

    const apiLocation = modelClient.post('Package');
    await head.packagedElements.add(apiLocation);
    const graphManager = new graphModule.GraphManager(apiLocation);

    Now that we have our graphManager made we are ready to use our modeled API. We will use the graphManager just like we use modelClient, let’s first create two nodes, and connect them with an edge, add the following to your generateAPI async expression:

    const nodeA = graphManager.post('Node');
    const nodeB = graphManager.post('Node');
    const edge = graphManager.post('Edge');
    nodeA.edge.add(edge);
    nodeB.edge.add(edge);
    edge.node.add(nodeA);
    edge.node.add(nodeB);
    await graphManager.put(nodeA);
    await graphManager.put(nodeB);
    await graphManager.put(edge);
    
    console.log('NodeA edge size: '+nodeA.edge.size());
    console.log('NodeB edge size: '+nodeB.edge.size());
    console.log('Edge node size: ' + edge.node.size());
    
    modelClient.close();

    Isn’t that neat! I’ll walk us along what just happened, first we instantiated a manager for our API. This manager controls objects at the level of abstraction generated, if we add more to the model, the more our manager can create.

    Next we used our manager to create, or “post” some objects to our server. We created two nodes, nodeA and nodeB, as well as a single edge, edge. After instantiating all of them to the server, we start filling out our data. We add the nodes to the edges node property, and we add the edge to the node’s edge property.

    Did you notice that, the types we created have properties, that can hold data we defined. If you look at your graph diagram, or explore the elements in the element explorer tree, you will see that the Node type has a property named edge, and the Edge type has a property named node. We are able to access those properties in code via our generated API.

    After populating the data we put all three instances back to the server for persistent storage so that we can use it next time. This is the functionality of the restful API that the uml-client auto-generates for you. For example below is an example of how to get the data we retrieved.

    const nodeA_id = nodeA.id;
    
    const nodeA_again = await graphClient.get(nodeA_id);
    assert (await nodeA_again.edge.front() == edge)

    Here it is displayed how we can use a unique id always assigned to objects in the generated API to access the object. It is also possible to access objects via the composition of the types we define, but we will look into that another time. We can run the code and double check everything works by entering the following into our terminal:

    $node .

    You should see some warnings pop up about multiplicities and names, that is to be expected, our model has not specified some basic parameters. But our log statements showing the size of the properties in our data should print. If you are having trouble reach out, I would love to help, [email protected] is my email.

    Conclusion

    This was a basic dive into the functionality of uml-cafe’s meta-modeling and code generation functionality. We created a very simple model, and were able to use it to persist our data in a modern and secure method. uml-cafe is not only a modeling tool to draft ideas, but a database to store the implementation of those ideas.

    Moving forward we will be using more features from uml-cafe to create unique data connections defined from the uml specification. We will touch onto unique features such as opposites of data, inheritance, and composition to best model the data being used within common systems. We will also be going over that functionality as it pertains to the API, and what a developer or architect should expect when implementing software solutions using their generated API.

    Thanks for reading, Em!