
One of the most powerful things that can be done with uml.cafe is it’s ability to generate JavaScript objects and functions that can be used in a RESTful API provided by the uml-client library. In this article I will show how to model out the types necessary for a graph network in uml.cafe, and then how to generate that model into an API for use in JavaScript applications.
Creating the Model
To start I’m going to create a project on uml-cafe. To do this you need an account so if you’re following along make sure to sign up for a free account. From there click the hamburger icon in the top right of the page, and click “Create Project”. This will bring up the project creation page. Choose an appropriate name and settings and click “Create” at the bottom of the page.
We are now looking at a blank model, let us quickly model out the data needed for our graph network API. Let’s rename our base package from Model to Graph, then click “Create Diagram” in the upper right of the page. Let’s click the first icon in the diagram palette, “Create Class”, then place the empty class on our diagram. I’m going to right click it and rename it to Node. This will be the type in our API to represent a node in a graph network.
I’m going to do the same thing and create another class named Edge this time. This will represent the connections aka: Edges, between nodes in our graph API. Now to define the relations between these two types, we will create two associations for them. We’re going to click the second to last icon in the diagram palette, If you hover the icon, it should show “Create Directed Association”. Make an association going from Node to Edge. Do it again and make an association between Edge and Node. Your diagram should look like the diagram in the image.
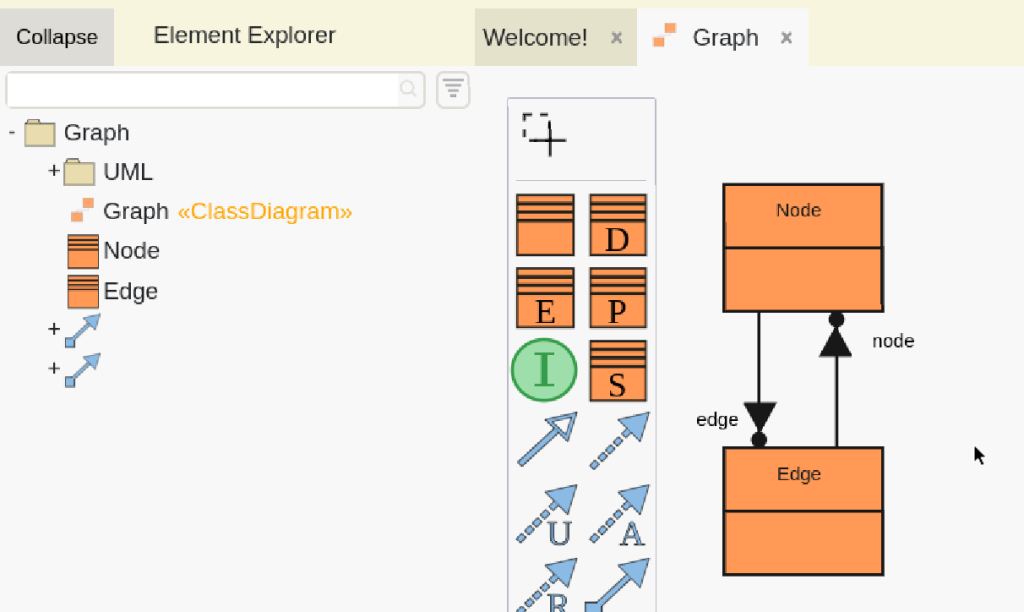
This is a very simple model done in one of many ways, but it will sufficient enough for creating a simple set of datatypes to use with the RESTful API provided through the library uml-client.
Generating and Using the API
To use the data types in the model we made, we can create a new project, or add to an existing project using nodejs. I just created a new nodejs application the following way:
$mkdir graph-example
$cd graph-example
$npm init -y
$npm i uml-client@latest
Now we have a new blank nodejs project with the latest version of uml-client installed. For this example we are going to just do everything in a single index.js file. Add the following to your package.json if you are following along:
"bin": {
  "main": "./index.js"
}
Now let’s begin writing our index.js code, first we need to import the necessary objects and functions from uml-client, this would be UmlNodeClient and generate(). UmlNodeClient is an object that holds our connection with the model’s server, and allows us to interact with it, generate() is a function that will allow us to generate a javascript object containing types we can construct and use to track data, we will use that slightly later. After importing we will instantiate a client like so.
#!/usr/bin/env
// index.js
import UmlNodeClient from 'uml-client/lib/nodeUmlClient.js';
import { generate } from 'uml-client/lib/generate.js';

const modelClient = new UmlNodeClient({
  address: "wss://uml.cafe/api/",
  group: "moe",
  project: "Graph",
  user: "moe",
  password: "XXXXXXXXXXXXXX"
});
Now to instantiate a UmlNodeClient object we need to supply an object with certain options specified, let us go one by one through them.
address : This is the address of the uml-cafe instance. If your project is hosted on uml.cafe the proper address is “wss://uml.cafe/api/”
group: This is the name of the user who created and owns the project. If you made the project, it will be your username.
project: This is the name of the project that we are connecting to.
user: The user whose role we will be using to access the server.
password: the plain text password to be used when connecting to the server.
You can easily get the information needed by quickly looking at the URL of your project in your internet browser. For example https://uml.cafe/moe/Graph, you can see that the group is moe and the project is Graph, as well as the address would translate to wss://uml.cafe/api/ by replacing http with ws and adding /api/ after the domain.
Note: There is also an object UmlWebClient, that behaves the exact same as UmlNodeClient, but it is made for the browser.
Continuing on we need to generate our API from our model with the function we imported. The function does a lot of communication with the server so it needs to be called and awaited to get the Package information from our model, this requires an async scope.
const generateAPI = async () => {
  await modelClient.initialization;
  const head = await modelClient.head();
  const graphModule = await generate(head, modelClient);
}
generateAPI();
generate() takes two parameters. The first is the location of the types for the API, right now we are just using the head / root of the model to generate our type information on everything in the model. The second location is our client, the API is based within our model so the generated API will share the connection with it. Now let’s use the module we generated, this is the cool part.
First we are going to get our special manager from the module created, graphModule.GraphManager. To instantiate a manager we need to tell it where in the model we want our data to be stored. We will quickly create a package and throw the data in there for now. The below code snippet shows how to do that with the existing modelClient.
const apiLocation = modelClient.post('Package');
await head.packagedElements.add(apiLocation);
const graphManager = new graphModule.GraphManager(apiLocation);
Now that we have our graphManager made we are ready to use our modeled API. We will use the graphManager just like we use modelClient, let’s first create two nodes, and connect them with an edge, add the following to your generateAPI async expression:
const nodeA = graphManager.post('Node');
const nodeB = graphManager.post('Node');
const edge = graphManager.post('Edge');
nodeA.edge.add(edge);
nodeB.edge.add(edge);
edge.node.add(nodeA);
edge.node.add(nodeB);
await graphManager.put(nodeA);
await graphManager.put(nodeB);
await graphManager.put(edge);

console.log('NodeA edge size: '+nodeA.edge.size());
console.log('NodeB edge size: '+nodeB.edge.size());
console.log('Edge node size: ' + edge.node.size());

modelClient.close();
Isn’t that neat! I’ll walk us along what just happened, first we instantiated a manager for our API. This manager controls objects at the level of abstraction generated, if we add more to the model, the more our manager can create.
Next we used our manager to create, or “post” some objects to our server. We created two nodes, nodeA and nodeB, as well as a single edge, edge. After instantiating all of them to the server, we start filling out our data. We add the nodes to the edges node property, and we add the edge to the node’s edge property.
Did you notice that, the types we created have properties, that can hold data we defined. If you look at your graph diagram, or explore the elements in the element explorer tree, you will see that the Node type has a property named edge, and the Edge type has a property named node. We are able to access those properties in code via our generated API.
After populating the data we put all three instances back to the server for persistent storage so that we can use it next time. This is the functionality of the restful API that the uml-client auto-generates for you. For example below is an example of how to get the data we retrieved.
const nodeA_id = nodeA.id;

const nodeA_again = await graphClient.get(nodeA_id);
assert (await nodeA_again.edge.front() == edge)
Here it is displayed how we can use a unique id always assigned to objects in the generated API to access the object. It is also possible to access objects via the composition of the types we define, but we will look into that another time. We can run the code and double check everything works by entering the following into our terminal:
$node .You should see some warnings pop up about multiplicities and names, that is to be expected, our model has not specified some basic parameters. But our log statements showing the size of the properties in our data should print. If you are having trouble reach out, I would love to help, [email protected] is my email.
Conclusion
This was a basic dive into the functionality of uml-cafe’s meta-modeling and code generation functionality. We created a very simple model, and were able to use it to persist our data in a modern and secure method. uml-cafe is not only a modeling tool to draft ideas, but a database to store the implementation of those ideas.
Moving forward we will be using more features from uml-cafe to create unique data connections defined from the uml specification. We will touch onto unique features such as opposites of data, inheritance, and composition to best model the data being used within common systems. We will also be going over that functionality as it pertains to the API, and what a developer or architect should expect when implementing software solutions using their generated API.
Thanks for reading, Em!